Automate Lead Qualification and
Rep Assignments
- How To Guide
- Automate Lead Scoring and Rep Assignments
When your team’s out there, every second counts.
In today’s fast-paced world, there’s no margin for error. You need a lightning-fast interface that lets your team capture and qualify leads in a flash, then seamlessly folds new leads into your existing routes.
Ensure every lead gets the attention it deserves, even at the last minute. And the best part? You’ll never send your reps too far off-course, keeping travel costs down and blowing efficiency through the roof.
That system is right at your fingertips. Automatically qualify leads, blend lead prospecting with customer visits, and ensure no opportunity slips through the cracks. There’s no more efficienct way to nurture the right leads and drive ROI into the stratosphere. So, what are you waiting for? Let’s set up your automated lead scoring system and unleash the full potential of your sales process.
AUTOMATE LEAD INTAKE
You don’t just want to qualify leads at a glance–you want an automated system that does the bulk of the work for you, so you can focus on what you do best: maximizing ROI!
To achieve this, you’ll need to automate your team’s reporting and lead intake. This allows you to streamline your qualification process by automatically importing new data.
Once you’ve set up custom forms that empower your team to submit key information on-the-go, you’re ready to automate your lead scoring.
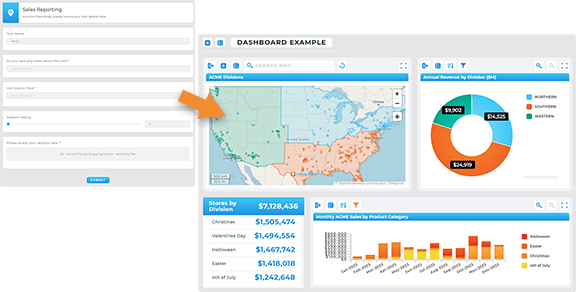

Pro Tip: Leverage Button Columns to auto-assign next steps to your team so nothing ever falls through the cracks!
AUTOMATE LEAD SCORING
Automatically score your leads based on distance from an existing service provider, or the cost to deliver to that customer. Here’s how to quickly set up the calculations you need for lead qualification. This ensures your sales teams prioritizes leads that are most likely to convert and be profitable, saving time and resources. By focusing on the most viable leads, your team can close deals more efficiently and maximize ROI. Here’s how to quickly set up the calculations you need for lead qualification.
QUALIFY LEADS BY DISTANCE
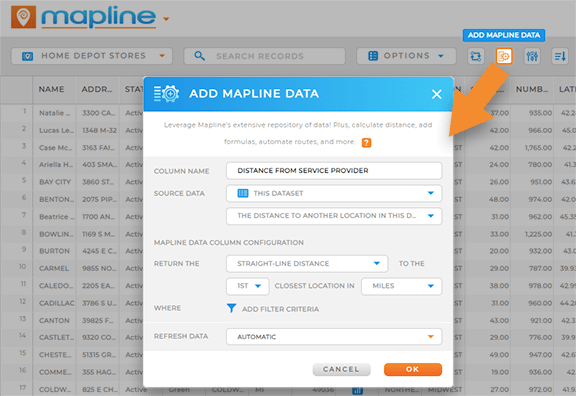
First, open your dataset and click the MAPLINE DATA icon in the menu bar. Choose a name for your new dataset column, such as DISTANCE FROM SERVICE PROVIDER, then select ANOTHER DATASET and choose your dataset from the source data drop-down.
Next, open the last drop-down menu and select THE DISTANCE TO A LOCATION IN ANOTHER DATASET. Choose either STRAIGHT-LINE DISTANCE or DRIVING DISTANCE, select your units, and add any applicable filters to ensure the right output.
When you’re finished, click OK. Depending on the volume of data you’re processing, it may take a few minutes for your new data to populate.
AUTO-CATEGORIZE LEADS
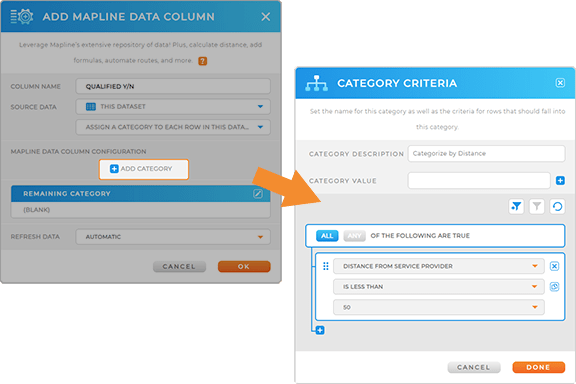
While you’re waiting, let’s add another Mapline Data column. Click the MAPLINE DATA icon, name your column QUALIFIED Y/N, then select THIS DATASET as the source data.
This time, choose ASSIGN A CATEGORY TO EACH ROW IN THIS DATASET from the drop-down menu. This is where you’ll categorize new leads so you can easily assign them based on your own custom criteria.
Configure your category criteria to effortlessly group and sort your data based on the specific conditions that are relevant to your business. When you’re finished, click DONE to apply your changes.
Now, every new lead will be categorized and sorted automatically, setting the stage for automated lead assignements.

Pro Tip: Leverage Mapline’s repository of advanced calculations and take advantage of any formula that exists in Excel–and even some that don’t! Prioritize leads by opportunity size, proximity, engagement level, or buying intent. This gives you the power to automate lead scoring while maximizing ROI!
AUTOMATE LEAD ASSIGNMENTS
Now, you’ve laid the foundation for automatic lead assignments based on territory or proximity to a sales rep. This is a powerful way to ensure that your lead assignments always make geographic sense, and your team is empowered to make the most of their time. Plus, you’ll avoid overlaps and missed opportunities, ensuring that leads are distributed efficiently and reps can focus on closing deals. With optimized lead assignments, your sales team can work smarter, cover more ground, and ultimately drive better results.
ASSIGN LEADS BASED ON PROXIMITY
Alternatively, assign leads based on their proximity to a sales rep.
Click the Mapline Data icon in the top menubar of your dataset and select THIS DATASET > THE DISTANCE TO ANOTHER LOCATION IN THIS DATASET.
Let’s say you want to keep your reps within a 25-mile radius of their starting location for the day.
In this case, you’ll configure your formula to return the straight-line distance to the first closest location. Choose your units, then click the FILTER icon to further customize your settings.
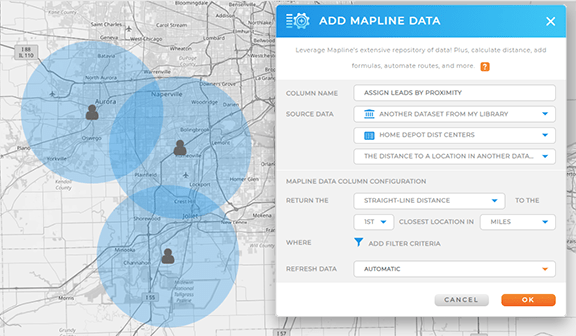
For example, to keep your reps within a 25-mile radius of their starting location, set a filter ensuring the straight-line distance is ≤ 25 miles. Apply additional filters as needed, such as:
- Rep start and end time
- Rep qualifications
- Rep specialties
- Meeting time windows
- Scheduled break times
Once you’ve applied your filters, click OK and you’re ready to go!
ASSIGN LEADS BASED ON TERRITORY
If you’ve already added custom sales territories to your map, you can assign leads based on which sales territory they fall under.
First, open your dataset and click the MAPLINE DATA icon in the top menubar. Select A MAP TERRITORY and choose MY MAPS as the source data.
Choose the map and territory layer you’d like to use, then select the type of calculation you need. For this example, we’ll use THE CELL VALUE OF A ROW IN ANOTHER DATASET.
This allows you to pull the name of the sales rep or territory into your dataset. Next, filter your data to exclude disqualified leads or leads with a zero value, then click OK.
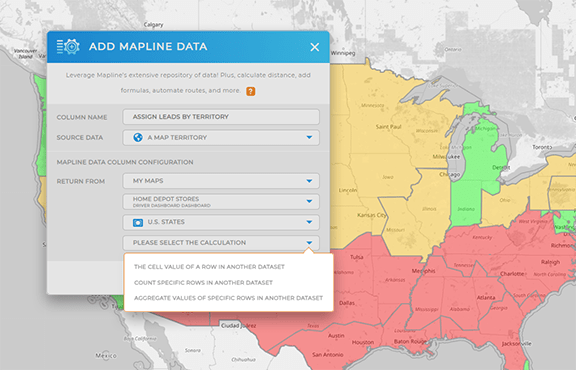
Now, your new Mapline Data column is ready to go! You’ve just created a dataset column that automatically lists the territory or sales rep a customer falls within. Isn’t that incredible?
OPTMIZE LEAD ASSIGNMENTS
Your lead qualification, assignments, and data entry are now fully automated, ensuring that all your data is up-to-date 24/7!
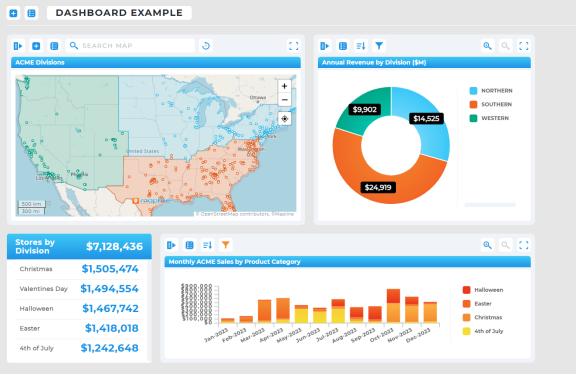
Add rep stats or customer maps to your dashboards so you can easily monitor activities and keep a high-level overview of your KPIs. Share forms, dashboards, and custom views with your team to keep everyone aligned and informed.
Or, if you have incoming leads that fall outside your ideal mile radius or that don’t meet your qualifications, you’ll be able to spot them instantly on the map. You can click the map pin and determine whether it makes sense to wrap them into your reps’ existing visits.
This custom lead scoring system gives you a bird’s-eye view of all lead assignments, ensuring you never miss an opportunity. How cool is that?
