Quick Reference Guide
ADD COLUMN: BUTTON COLUMN
- Quick Reference Guide
- BUTTON COLUMN
Buckle up and get ready to supercharge your brand with powerful automations that transform the way you do business. Button columns revolutionize your data management by allowing you to seamlessly integrate forms, files, communications, actions, and visualizations directly into your Mapline datasets!
Optimize your processes, enhance communication, and execute actions with pinpoint accuracy. Automate your tasks, minimize manual effort, and ensure flawless operations. It’s time to transform your routine processes and tap into the power of automation. Let’s explore the power button columns–here’s how to get started adding buttons and custom actions to your datasets.
ADD BUTTON COLUMN
Sometimes, your dataset needs a little extra kick—a way to automate tasks, send out communications, and streamline operations with a single click. That’s where button columns come into play. Adding one is the first step in setting up workflows that make your life easier and your business more efficient.
First, click the ADD COLUMN button in the top menubar of your dataset and select BUTTON COLUMN. Name your new dataset column and click OK.
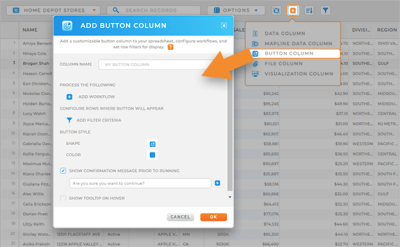

Pro Tip: Choose a column name that reflects the purpose of your button. It sounds simple, but this column is going to become the control center for some serious automation! This name should serve as a clear indicator of the button’s function, helping you and your team know exactly what each button does at a glance.
CUSTOMIZE WORKFLOWS
Now that we’ve got our button column set up, it’s time to define what happens when that button gets clicked. This is where the real magic happens—customizing workflows. Workflows are the backbone of your automation, and they allow you to trigger actions, send communications, and even update datasets, all with pinpoint precision.
ADD ACTIONS
Actions are the heart of your workflow. These are the tasks that get fired off once certain conditions are met. Whether it’s updating dataset rows, sending emails, or even opening a webpage, actions are what turn your button column into a powerful automation tool!
Select the type of actions you need in your workflow. Click the hyperlink for more detail on how to customize each type of workflow:
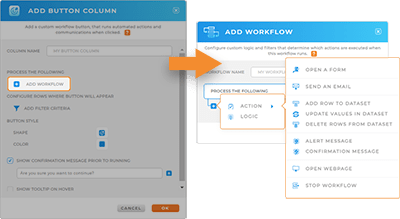
- OPEN A FORM: Launch a form directly from your dataset
- SEND AN EMAIL: Automatically send an email when specific conditions are met
- ADD ROW TO DATASET: Seamlessly add new entries to your dataset when certain triggers occur
- UPDATE VALUES IN DATASET: Instantly update specific cells in your dataset based on your own custom triggers
- DELETE ROWS FROM DATASET: Remove outdated or irrelevant data automatically when the right conditions are met
- ALERT MESSAGE: Display a pop-up message to notify users of important information or actions required
- CONFIRMATION MESSAGE: Direct users to a specific webpage automatically as part of your workflow
- STOP WORKFLOW: Halt the entire workflow at a specific point, giving you control over when and how the process continues
ADD LOGIC
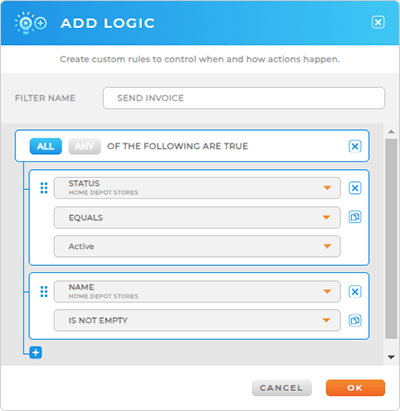
Logic is what makes your workflows smart. By adding your own custom conditions, you can ensure that actions only fire off when certain criteria are met. This customization allows for highly-tailored automation that suits your specific needs.
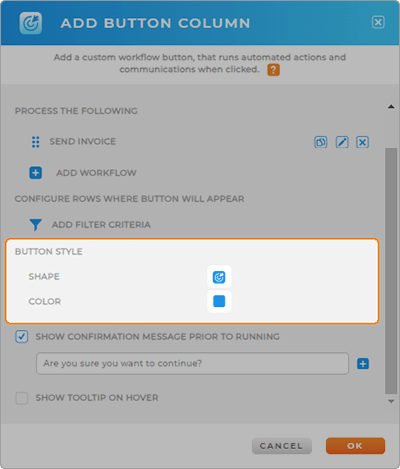
CHOOSE BUTTON STYLE
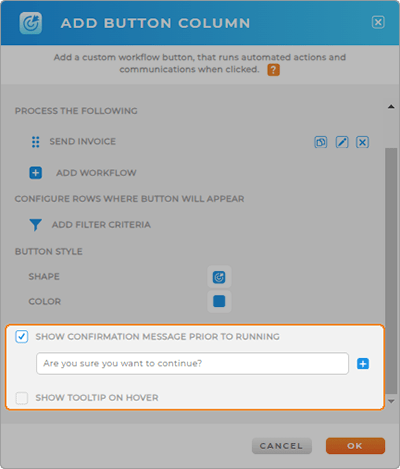
Now that your workflow is ready to go, it’s time to make that button stand out. Users can choose the color and shape of their button icon, ensuring it’s visually distinct in the dataset.
This button isn’t just functional—it’s your way of adding a personal touch to the automation process. And remember, a button that looks good and is easy to spot can make all the difference in day-to-day operations.
CUSTOMIZE BUTTON SETTINGS
Last but not least, let’s review your completion settings. Customize everything from completion messages to tooltip settings and post-submission actions. This is a powerful way to create end-to-end workflows that empower your team to stay on top of customer needs and important action items. Choose from the following customizations:
- Confirmation message: Ask users to confirm before executing an action
- Show tooltip on hover: When hovering over a button, display a label that explains its function
