Quick Reference Guide
CONNECTORS: SALESFORCE
PREREQUISITES
Let’s make sure you’re ready to roll! Before connecting Salesforce to Mapline, here’s what you need:
- Mapline account login information
- Salesforce Lightning Experience login
- Salesforce OAuth credentials (Client ID & Client Secret)
If you don’t have OAuth credentials set up in Salesforce, don’t sweat it! We’re about to dive into everything you need to know to access them.

CREATE CONNECTED APP
First things first—log in to your Salesforce account and make sure you’re using Lightning Experience (not Classic). If you’re already there, great! Now, head over to Setup by clicking the gear icon in the top-right corner. This is where you’ll find everything you need to configure your Salesforce environment.
Next, in your left-hand sidebar, look under the APPS and select APP MANAGER—this is where Salesforce lets you create and manage all the apps connected to your account. Once you’re in, you’ll see a list of existing apps, but what we care about is creating a new one.
Once you’re in App Manager, you’ll spot the option to create a new app. Click NEW CONNECTED APP at the top-right of the page, and you’re ready to go!

Pro Tip: Want to know which Salesforce experience you’re using? Just check your URL:
- If it ends in my.salesforce.com, you’re using Lightning Experience
- If it ends in classic.salesforce.com, you’re in Classic Mode
Admins can switch to Lightning by clicking their username in the top-right corner and selecting SWITCH TO LIGHTNING EXPERIENCE.
CONFIGURE CONNECTED APP
Now, we’ll set up some basic info. You’ll want to give your app a clear name—something like MAPLINE CONNECTION works great.
Next, add a contact email, and then you’re ready to configure the rest of your app settings.
Here are the recommended configurations for your Mapline connection:

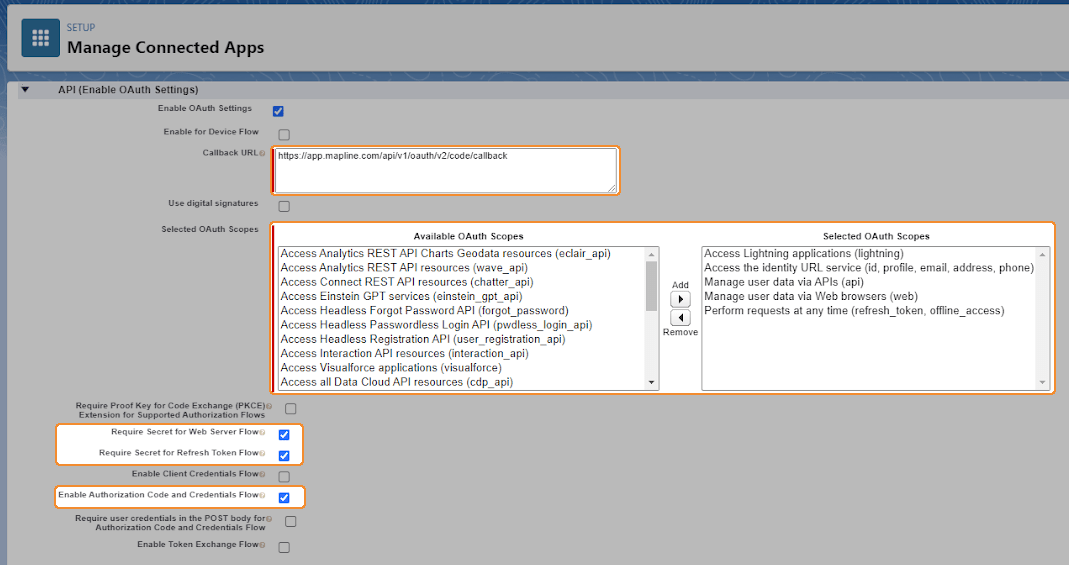
COPY OAuth CREDENTIALS
Now that your Connected App is up and running, let’s grab the credentials that are going to power this connection. Head back to App Manager, find the app you just created, and click VIEW. This is where you’ll access the details you need to connect Salesforce with Mapline.
In the API section, look for MANAGE CONSUMER DETAILS. After verifying your identity, you’ll get access to your Consumer Key (Client ID) and Consumer Secret (Client Secret).
These two pieces of information are what you’ll use to securely link your Salesforce data with Mapline. Copy both, or keep this tab open, and let’s head on over to Mapline to enable your connection!

AUTHORIZE YOUR CONNECTION
Now, you’ll need to enter your Salesforce OAuth credentials. Just copy your Salesforce Consumer Key and paste it into the CLIENT ID field.
Then, copy your Salesforce Consumer Secret and paste it into the CLIENT SECRET field.
After you’ve input your details, click OK to finalize the connection.
And just like that—BOOM!—you’ve connected Salesforce to Mapline. Now, you’re ready to start seamlessly sharing data between platforms. How incredible is that?
