
Quick Reference Guide
Workflow Actions: Open Webpage
- Quick Reference Guide
- WORKFLOWS
- Open Webpage
Want to direct users to a specific site after they complete an action? The Open Webpage step lets you send them anywhere—whether it’s a thank-you page, external resource, internal dashboard, or next step in their workflow.
This is perfect for guiding users through multi-step processes, collecting additional inputs, or simply providing a polished experience after form submissions or button clicks. Let’s dive into how it works.
ADD A WEBPAGE STEP
To add an Open Webpage step to your workflow:
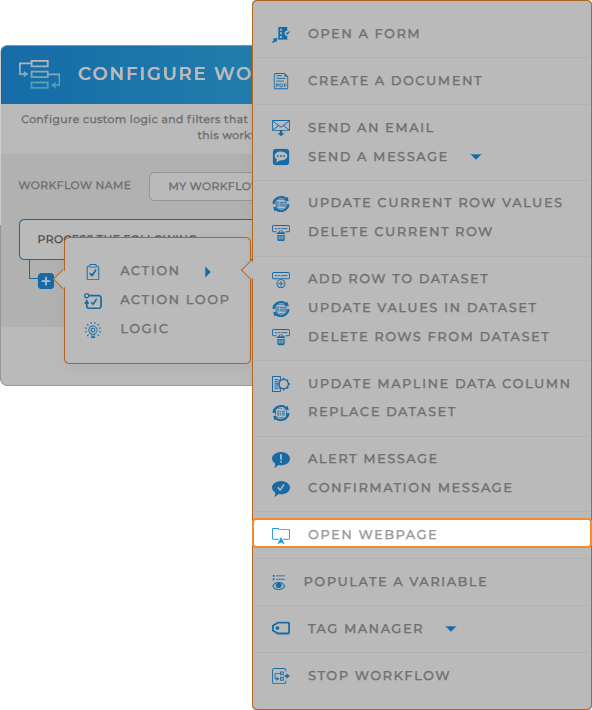
- Click the + icon in your workflow
- Choose Step > Open Webpage
- Name your step (like “Redirect to Thank You” or “Go to Dashboard”)
This inserts a navigation step directly into your workflow—so users are taken to a specific URL once the step runs.

Pro Tip: Combine Open Webpage with a Confirmation Message for smoother transitions. For example: “Thanks for your input! Ready to visit our help center?” Then link them there with a single click.
CONFIGURE THE URL
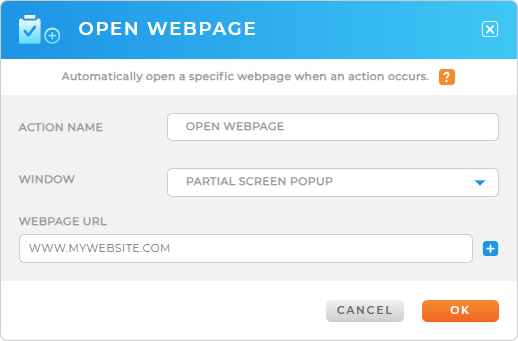
Now it’s time to tell the workflow where to send your users:
- Webpage URL: Paste the full URL of the page you want to open (make sure it starts with
https://) - Open In: Choose whether the page opens in a new tab or the same window
Whether you’re redirecting to a help center, client portal, or external site—Mapline handles the transition seamlessly.
APPLY CONDITIONS (OPTIONAL)
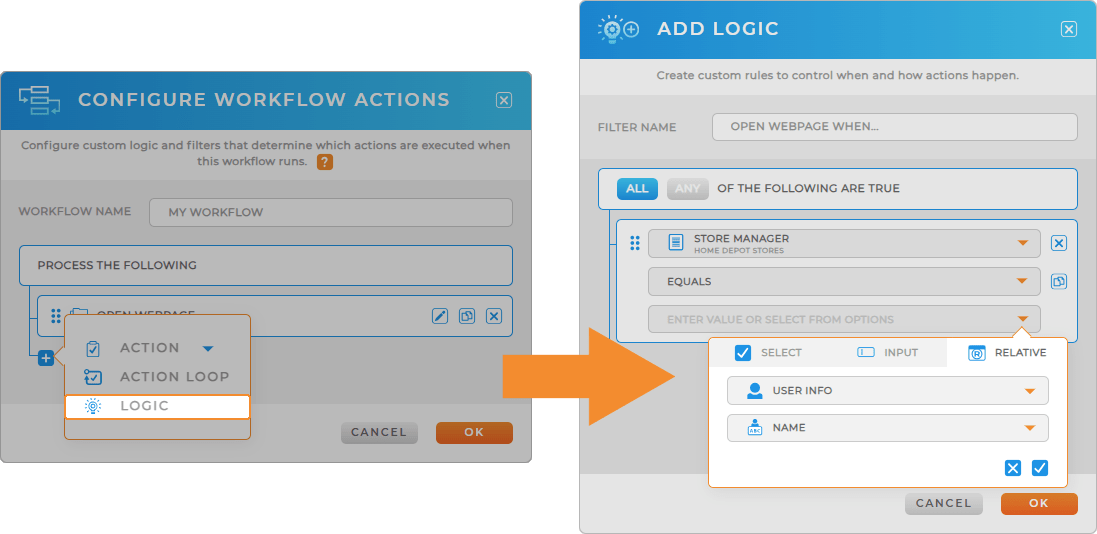
Want the redirect to happen only in specific cases? Use the Conditions tab to create logic like:
- Only redirect if the user selects a certain form response
- Only redirect if the user is a specific team member
- Only redirect when a status is marked as complete
This allows you to personalize the workflow experience—and send users to the right page at the right time.
GIVE USERS A NEXT STEP
Once the Open Webpage action is configured, it becomes a seamless bridge between your workflow and external resources. Whether you’re directing users to a dashboard, help center, or personalized landing page, this action helps you extend the value of every interaction. It’s ideal for driving follow-through, offering next steps, or delivering contextual content without manual hand-holding. From here, you can continue the workflow behind the scenes or prompt user input to shape what comes next.
After setting up the Open Webpage workflow action, you can:
- Populate a Variable to dynamically influence follow-up actions based on the page destination
- Stop Workflow to pause further automation until the user returns or takes action
- Show Alert Message beforehand to confirm the user is ready to leave the platform
- Update Current Row Values to capture which resource was accessed or when
It’s a simple but powerful way to polish your workflows and drive the right actions at the right time.


