Quick Reference Guide
WORKFLOW ACTIONS: SEND EMAIL
- Quick Reference Guide
- WORKFLOWS
- SEND AN EMAIL
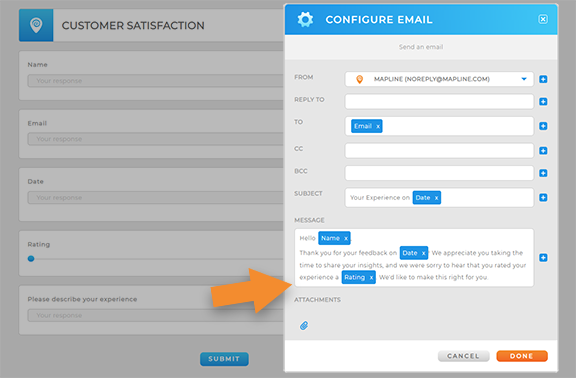
Automatically trigger emails at exactly the right moment—whether it’s confirming an appointment, notifying your team about an update, or keeping customers in the loop!
Imagine this: A technician marks a job complete, and within seconds, the customer receives a confirmation email with a job summary—automatically. No extra steps, no manual follow-ups. That’s the power of Mapline’s SEND AN EMAIL workflow action. You set it up once, and Mapline does the work for you, ensuring that emails are sent quickly, accurately, and with the right information every time. Here’s how to make it happen:
ADD NEW ACTION
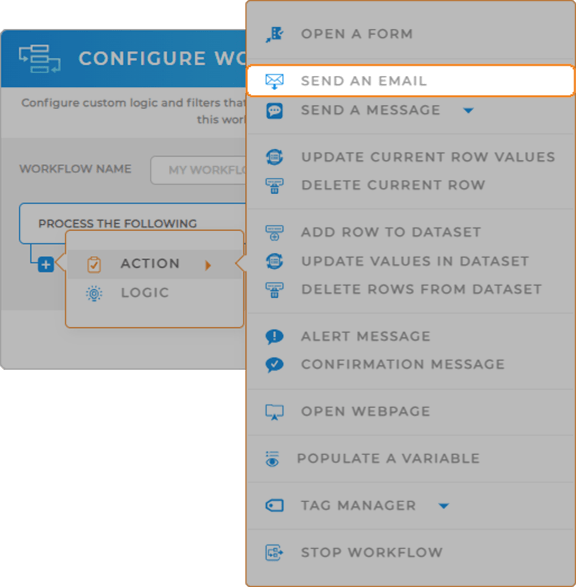
To get started, you’ll first need to add Send an Email as an action to your workflow.
When adding a button or menu to your dataset, head over to the WORKFLOWS section and click ADD WORKFLOW. A blue (+) plus sign will appear—click that, hover over ACTION, and select SEND AN EMAIL.
This step is where the magic begins. By integrating an automated email workflow, you’re ensuring that critical messages are sent instantly—without manual effort.
Whether it’s an appointment confirmation, a follow-up notification, or a team update, this action eliminates the risk of delays and keeps communication seamless.
CUSTOMIZE EMAIL
Once the Send an Email action is in place, it’s time to customize the message so it delivers exactly what you need.
Action Name: Think of this as the label for your email action. If you’re setting up an appointment confirmation email, you might name it “Job Completion Confirmation.” This makes it easier to manage multiple workflows later.
Select Email Service: By default, emails will be sent via Mapline Email Service—but if you prefer, you can connect your own email provider for greater flexibility.
Who’s Sending the Email? Here’s where it gets interesting. You can manually enter an email address, or let Mapline dynamically pull in an email from your dataset or form. For example, if a service technician marks an appointment as complete, the email could come directly from their address instead of a generic inbox.
Why is the Recipient Receiving This Email? This is your chance to explain why the email is being sent. Maybe it’s a confirmation of an action taken, an update on a service request, or a reminder about an upcoming meeting. This section helps ensure clarity and reduces confusion.
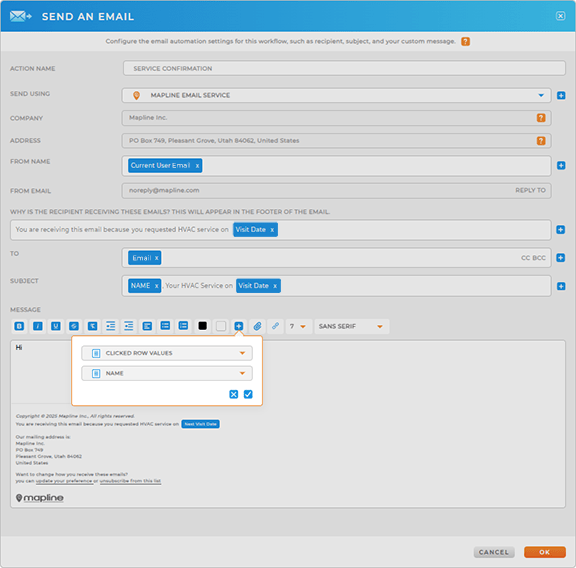
To, Subject, and Message: Now, fill in the actual email details:
- To: Enter the recipient’s email manually or pull it from your dataset.
- Subject: Make it clear—e.g., “Your Appointment is Confirmed!”
- Message: Craft a professional email that includes dynamic tags like names, dates, or details from your dataset or form. This personalization makes each email feel tailored and relevant to the recipient.
Once everything looks good, click OK—your automated email workflow is ready to roll!

Pro Tip: Workflows can be triggered in two ways:
✔ From a dataset: Add a button column so users can trigger the email manually when needed.
✔ From a form: Set up an automatic email that fires as soon as a form is submitted.
This means you have full control over when and how emails are sent—whether it’s a one-click action from a dataset or a fully automated response from a form submission.
AUTOMATE EVERYTHING WITH WORKFLOWS
Emails are just the beginning! With Mapline’s powerful workflows, you can automate key actions at the click of a button or whenever a form is submitted.
Here are just a few other ways workflows can keep things running smoothly:
- Automatically update dataset values when actions are taken
- Redirect users to a specific webpage after completing a form
- Send real-time notifications via Google Chat or Slack
With Mapline Workflows, manual tasks disappear, communication improves, and your team operates more efficiently.
