Mapline’s Versatile Routing
Written by Nicholas Keenan
Mapline’s routing is something we’ve put a lot of effort into. Today’s post is going to be a deep dive into how to best make use of this versatile tool. Don’t worry, it’s going to be an enjoyable deep dive, like the kind one does off the Caribbean Reefs. But with less coral and starfish and more streets and stops. In hindsight, that metaphor broke down a little at the end.
We’ll start with the most basic application of Mapline’s routing tool, just a real simple “How-to” type discussion. If that’s all you’re looking for, you’ll be free to go. Afterwards, I’ll go step-by-step deeper into showing how versatile the tool can be.

The Base Line
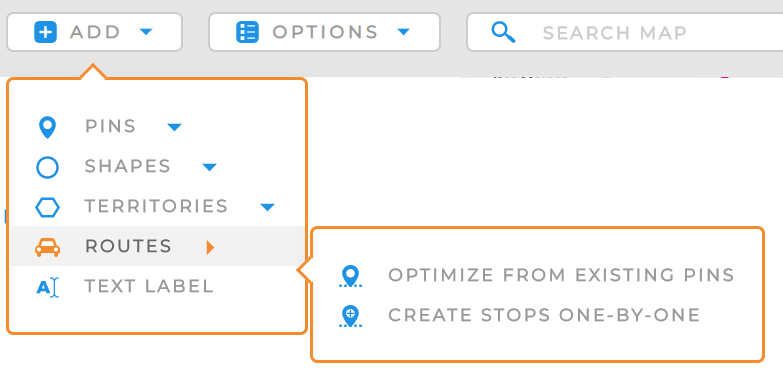
At its most basic level, if you click “Add” and then “Route” you’ll see Mapline’s two routing options: “Optimize From Existing Pins” and “Create Stops One-By-One”. So what do these mean? These refer to the two basic ways to craft a route.
“Optimize From Existing Pins” lets you draw a big shape around a gathering of pins and Mapline will find the fastest route that connects them all. You can always manually change them around afterwards if you see fit. ““Create Stops One-By-One” is a bit more hands on. With this option you click a first stop, then a next stop, lather, rinse, and repeat. It’s not as fast of a process as “Optimize From Existing Pins”, but you get exactly the route that you want.
But this is just the tip of the iceberg. If you just wanted to know the basics of the routing tool, now you do. Yay! But if you have a minute to see some of the cooler nuances of Mapline’s routing tool… buckle up.

The Cool Stuff
Here’s a little tip, we’ve integrated routing in to nearly everything. That’s not hyperbole. Let’s start at the top. You know that search bar? We’ve talked about the search history in other posts. Reminder, you can route from that search history. That’s right. If you want to create a route, you just have to search for it. Which is a nice transition to the next routing integration.
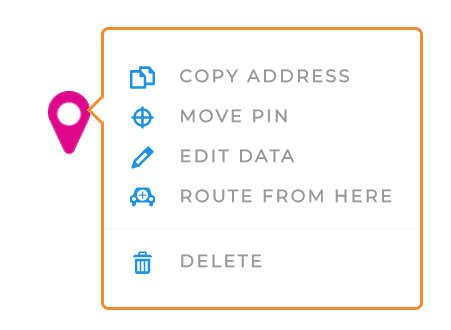
If you right-click on any pin, you will see an option to add it to a route. Every pin on the map, whether part of a dataset, or just from using the search bar, can be added to a route. There’s other things to right-click as well. If you right-click on any dataset on your left sidebar, you can route every pin said dataset.
But wait, there’s more! You can also just right click a territory on your map and route every pin in that territory. After creating sales territories for your reps, instantly generate routes for each of them. Not only see a 30 mile radius around a point, but connect all the pins within that radius. Any territory has a chance to now create a route.
So in short, your territories, pins, datasets, search history, radii, and your neighbor’s pet can now all be a source of a route. Fine, the last one isn’t technically true, but it sure feels that way now that everything else has been integrating into routing.

The Niche Stuff
Some of the tips in the last category may not apply to everyone. But I think they’re still awesome so I wanted to call attention to them. Here a few niche tricks you can do with Mapline’s routing tool:
- Search new points while creating route – You can use the search bar to add routes on the fly of a Route Stop-by-Stop. Search for an address while using Mapline’s routing tool. Then just click on the temporary pin created to add it to your route.
- Delete stop points from sidebar – This one is pretty straight forward. You can delete any stop from your route by simply right-clicking on it.
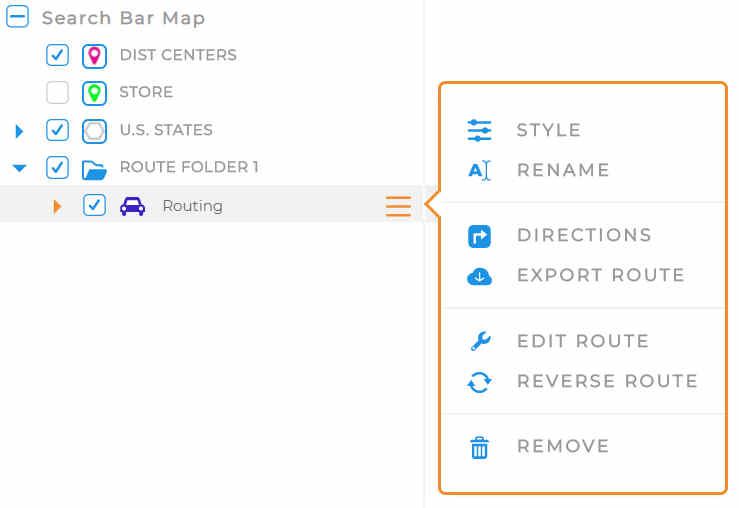
- Reverse the route – Whatever was your last stop will become the first route, and vice versa. This route was explicitly the result of customer requests! We’re not joking when we say your feedback matters.
- Right click options – You can restyle, re-edit, and reconfigure a route by right-clicking on said route on either the side bar or the map itself (see image).


