CONNECT OTHER PLATFORMS TO MAPLINE
Unlock the full potential of your data with Mapline’s Connectors!
Seamlessly integrate your existing systems and tools, allowing your data to flow effortlessly between platforms. Whether you’re syncing customer data, pulling analytics from multiple sources, or automating workflows, Mapline Connectors make it simple to keep your team aligned and your operations running smoothly—all without missing a beat.
To get started, select the application you’d like to connect to and follow the provided instructions.

HOW TO CONNECT MAPLINE TO GOOGLE SHEETS
Instantly pull your Google Sheets data directly into Mapline, making it easier than ever to map, analyze, and optimize your business operations! Here’s how:
Prerequisites
- Mapline user account
- Google account login information
Setup Guide
Connect Google Sheets to Mapline
- Log into Mapline: Start by logging into your Mapline account.
- Access Connectors: In the top-right menu bar, click on your name, then select Connectors.
- Add a New Connection: Once you’re in the Connectors page, click the blue + icon to create a new connection.
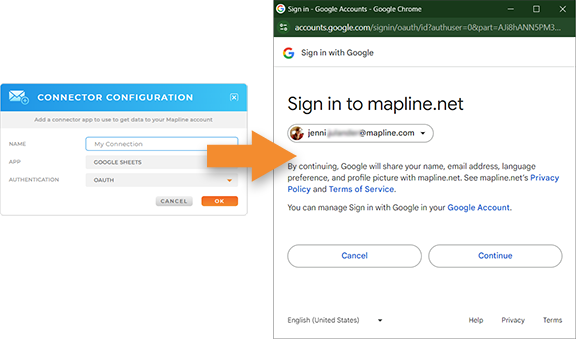
- Set Up Google Sheets Connection:
- Name your connection (e.g., GOOGLE SHEETS CONNECTION).
- From the dropdown menu, select Google Sheets as the application.
- Log in to Google:
- Enter your Google account information
- Complete the Connection: After inputting your login information, click CONTINUE to finalize your Google Sheets connection.
Important Considerations
- API Access: Ensure your Google Sheets API is enabled in your Google Cloud Project. If you’re experiencing trouble connecting, ensure the spreadsheet you’re trying to access has the correct permissions.
If you’re having trouble connecting, check out this help article on authorizing apps in Google.

HOW TO CONNECT MAPLINE TO SALESFORCE
seamlessly integrate your Salesforce data into Mapline’s powerful Geo Analytics, transforming how you visualize and manage your sales efforts.
Prerequisites
- Mapline user account
- Salesforce OAuth credentials (Client ID & Client Secret)
Setup Guide
Step 1: Get Salesforce OAuth Credentials
To connect Salesforce with Mapline, you’ll first need to create a Connected App in Salesforce.
- Log in to Salesforce
- Navigate to Platform Tools: In your lefthand sidebar, under Apps, select App Manager
- Create Connected App: Click NEW CONNECTED APP at the top of the page
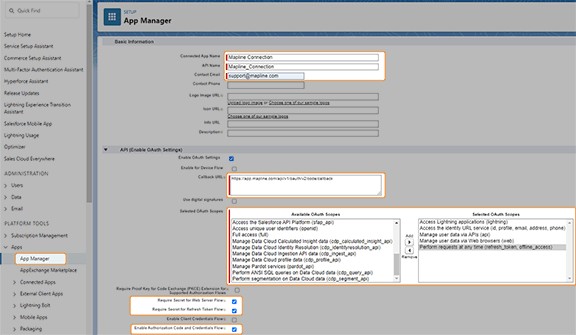
- Fill in Basic Info: Enter the Connected App name (e.g., “Mapline Connection”) and a contact email
- Enable OAuth: In the API section, click the checkbox next to ENABLE OAUTH SETTINGS
- Enter Callback: Under CALLBACK URL, enter https://app.mapline.com/api/v1/oauth/v2/code/callback
- OAuth Scopes: Select the following scopes:
- Access Lightning applications (lightning)
- Access the identity URL service (id, profile, email, address, phone)
- Manage user data via APIs (api)
- Manage user data via Web browsers (web)
- Perform requests at any time (refresh_token, offline_access)
- Enable Flow: Select the following checkboxes:
- Require Secret for Web Server Flow
- Require Secret for Refresh Token Flow
- Enable Authorization Code and Credentials Flow
- Save Changes: Save the app you just created
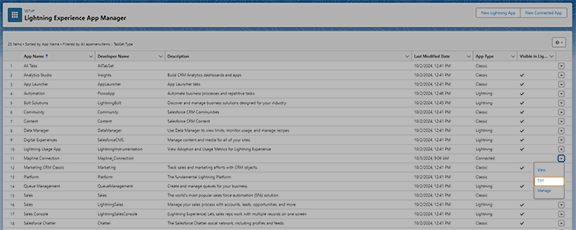
- Open App: Navigate back to Platform Tools > Apps > App Manager. Click the dropdown next to App Manager and select VIEW
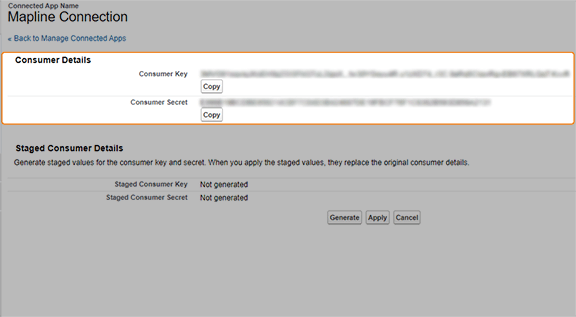
- Access OAuth Credentials: In the API section, select MANAGE CONSUMER DETAILS. Verify your identity, then copy your Consumer Key (Client ID) and Consumer Secret (Client Secret)
Step 2: Connect Salesforce to Mapline
- Log in to Mapline: Log in to your Mapline account if you haven’t already
- Access Connectors: In the top-right menu bar, click on your name, then select Connectors
- Add a New Connection: Once you’re on the Connectors page, click the blue + icon to create a new connection
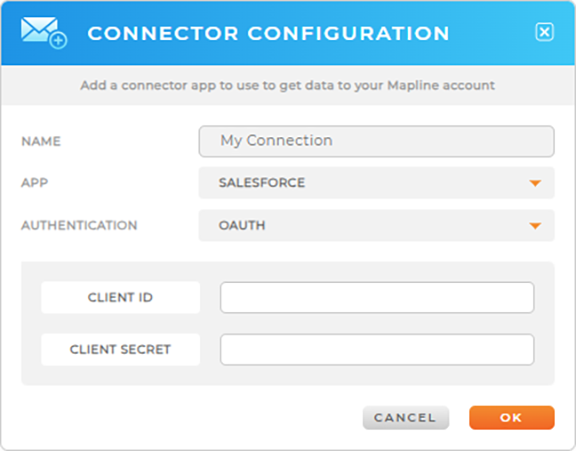
- Set Up Salesforce Connection:
- Name your connection (e.g., “Salesforce Connection”)
- From the dropdown menu, select Salesforce as the application
- Input Salesforce OAuth Credentials:
- Enter your Salesforce Client ID and Client Secret into the respective fields
- Complete the Connection: After inputting the required information, click OK to finalize your Salesforce connection
Important Considerations
- API Access: Ensure your Salesforce account has the necessary API access. For users with Salesforce’s Professional or Essentials editions, API access may require an additional purchase
- Sandbox or Production Account: Make sure to select the correct environment (Production or Sandbox) when authenticating your Salesforce account. Sandbox accounts are typically used for testing purposes, while Production accounts handle live data
If your connection fails, ensure that:
- The Salesforce Client ID and Client Secret are correctly entered
- Your Salesforce user has sufficient permissions and API access enabled
If you’re having trouble connecting, check out this help article on authorizing apps with OAUTH in Salesforce: Salesforce OAuth Troubleshooting.
WE'RE ALL ABOUT
YOUR
SUCCESS
HOW WOULD YOU LIKE TO GET IN TOUCH:
Chat
Call
Email
Cal
WE'RE ALL ABOUT
YOUR
SUCCESS
HOW WOULD YOU LIKE TO GET IN TOUCH:
Chat
Call
Email
Cal
WE'RE ALL ABOUT
YOUR
SUCCESS
HOW WOULD YOU LIKE TO GET IN TOUCH TO SCHEDULE YOUR DEMO:
Chat
Call
Email
Cal
Give us a call. We'd love to talk!
+1 800.969.1454
Give us a call. We'd love to talk!
+1.888.670.3795

Experience the power
Get ready to see your data in a whole new way!