
Automate Trip Planning + Optimize
for Profitability
- How To Guide
- Automate Trip Planning and Optimize for Profitability
How many times have your reps dashed to a customer’s door, only to find them out to lunch or tied up in a meeting? Or how about when a rep was assigned to a customer an hour away, only to find out later that another sales rep was already in the area? Think of all that wasted mileage–that’s your budget, scattered to the wind like leaves.
Smart schedules are your ace in the hole, streamlining all of your sales visits into geo-intelligent routes that give your team the power to dazzle customers like seasoned pros. With just a snap of your fingers, you can seamlessly coordinate rep and customer schedules, ditch manual schedules, and prioritize high-potential clients. No more accidental double-booking or missed appointments.
Your team will know precisely who to visit and when, all while slashing travel time and expenses in half. This kind of system empowers you to adapt schedules on the fly and seize every opportunity that comes your way.
And here’s the kicker: with real-time insight into your reps’ hustle, expenses, and time management, you become a master conductor, fine-tuning every beat for maximum success. So, when you automate your routes and factor in customer availability, you’re not just managing chaos—you’re turning it into pure efficiency, and that’s how you soar to the top!
Let’s set up your automated trip planning system and optimize your sales visits for maximum profitability. Here’s how.
CONFIGURE CUSTOMER DATA
First, let’s ensure your customer dataset contains the right information to generate smart routes. If you’ve already automated your data collection, you’re well on your way to ensuring you have the data you need to create routes that account for every possible factor impacting sales.
You’ll want to ensure that your dataset includes the following columns:
- Visit Time Windows
- Rep Availability
- Last Visit Date
- Next Visit Date
- Visit Frequency
- Projected ROI
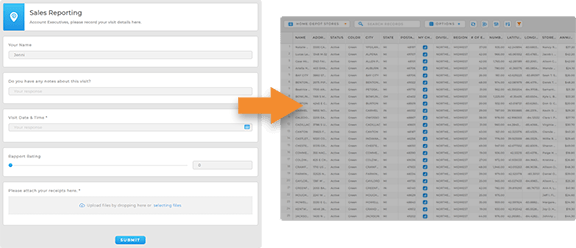
If you have some or all of this data in your dataset, you’re ready to move on to the next step. (And if not, don’t sweat it! Automate your data collection now, and your system will be ready to go as soon as new data starts rolling in).

Pro Tip: You don’t have to make your reps manually fill out all of this data with every visit. Instead, create dynamic forms that collect metadata. Then, use Mapline Data to calculate factors like next visit date, streamlining your data collection process so your reps can get back to what they do best–sealing those deals!
CREATE SMART ROUTES
Now, let’s tap into the power of geo-intelligent routing that accounts for any factor impacting your sales visits. Take into account rep starting points, rep schedules, customer availability, customer profitability, mileage limitations, and more! Here’s how to optimize your routes for the utmost efficiency.
First, open your map and click the layer folder containing your customer locations. Select ADD MAPLINE DATA from the pop-out menu. Then, let’s explore two powerful ways to optimize your routes:
ROUTE BY CUSTOMER AVAILABILITY
Write routes that take your rep schedules and customer availability into account so you never waste time on another visit!
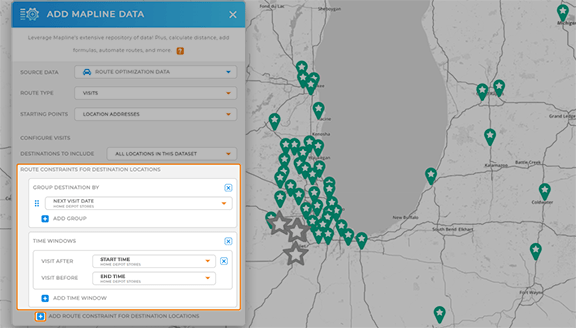
Select ROUTE OPTIMIZATION DATA as the source data, then customize your route optimization settings.
Under ROUTE CONSTRAINTS FOR DESTINATION LOCATIONS and select TIME WINDOWS.
Click the VISIT BEFORE drop-down menu, click the COLUMN tab, and select your dataset column listing the preferred arrival time for each client. Then, repeat this step for the VISIT AFTER field.
Next, click the blue + sign next to ADD ROUTE CONSTRAINT and select GROUP DESTINATION BY. Here, select your NEXT VISIT DATE column, ensuring that your stops are grouped by next visit date, and assigned to the right time slots.
Finish configuring your advanced route optimization settings according to your preferences, then click OK when you’re done.

Pro Tip: Collect real-time updates from your team in the field and keep a high-level overview of where your team is 24/7. Empower your team to submit new leads, visit notes, expense reports, receipts, and real-time location updates, all in just a few seconds!
ROUTE BY PROJECTED PROFITS
Generate routes that prioritize the most profitable clients first!
First, customize your starting point preferences.Then, under CONFIGURE ROUTES > OPTIMIZE ROUTES BY, select MAXIMIZE VALUES, then select the dataset column that lists the estimated ROI for each client.
Finish configuring your advanced route optimizations, then click OK when you’re done.
Now, you’ll automatically generate routes for the most profitable clients, ensuring that your sales reps make the most of their time!


Pro Tip: Explore other customizations in your advanced route optimization settings, including mileage limits, break times, visit duration, or any other factor impacting your schedules. This ensures that your team operates within their budget and that they always have enough time for client visits.
ADAPT IN THE MOMENT
But it doesn’t stop there! If a rep calls in sick, a visit has to be rescheduled, or a new lead rolls in at the last minute, you’ll want to ensure you can always pivot and adapt to changes. Let’s add a Mapline Data column to your dataset that automatically schedule new apointments and reschedule missed appointments based on the criteria you need.
Click the layer folder containing your customer locations. Select ADD MAPLINE DATA from the pop-out menu. Next, let’s review two methods for automated sales rep schedules:
AUTO-SCHEDULE NEW LEADS
If you’ve already automated your lead scoring and rep assignments, you’ve laid the foundation to wrap new leads into your existing schedules. (If not, you’ll want to complete this step too!)
Score your leads based on distance or drive time, then assign them to the correct sales rep based on territory or proximity.
For your source data, select ANOTHER DATASET FROM MY LIBRARY, click the dataset that contains your rep locations, then select THE DISTANCE TO A LOCATION IN ANOTHER DATASET.
Finally, configure your distance calculations and click OK.
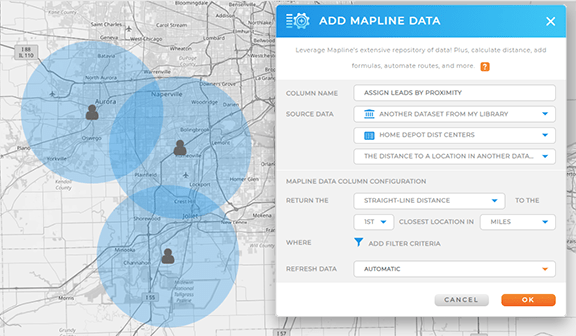
You just added a new column to your dataset that lists the distance to the nearest available rep! This gives you the power to automatically wrap new leads into your existing visits, ensuring every lead gets the attention it deserves. Keep your reps on-course and minimize travel costs while blowing efficiency through the roof!

Pro Tip: Add a second column in your dataset that lists the name of the closest rep. This makes it easier for you and your team to review and assign reps by name. Simply select THE CELL VALUE OF A ROW IN ANOTHER DATASET as the calculation type, then configure your settings accordingly.
RESCHEDULE MISSED VISITS
Even the most efficient schedules experience last-minute changes due to unforeseen circumstances. Ensure missed and canceled visits are automatically rescheduled in the most logical and efficient way possible.
In your advanced route optimization settings, you can update your filter to reroute locations with a missed or rescheduled visit.
Under DESTINATIONS TO INCLUDE, select SOME LOCATIONS IN THIS DATASET, then click FILTER LOCATIONS TO INCLUDE.
Then, apply the following filters:
- STATUS EQUALS Reschedule | Missed | Blank
- NEXT VISIT DATE IS ON OR BEFORE Today’s Date
- NEXT VISIT DATE IS Blank
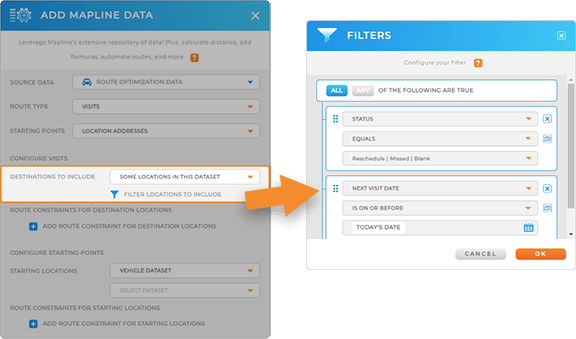
When you’re done adding filters, click OK. Finish configuring your route optimizations, then click OK again.
Now you have an automated system that auto-reschedules missed visits, ensuring that nothing ever falls through the cracks. Are you kidding me? And you’ll never wonder if opportunities are falling by the wayside, because you can visualize mileage reports, rep stats, and more on your sales dashboards. Now, you have the automations and visibility to manage your team like the pro you are!

Pro Tip: Be sure the STATUS field exists in your team reporting. Then, every time a sales rep fills out a form, they can report missed visits and update the customer status. Configure your form button settings to ensure this data auto-imports into your customer dataset, and BOOM! You have a system that flags missed visits.


