Quick Reference Guide
Mapline Data: Advanced Routing
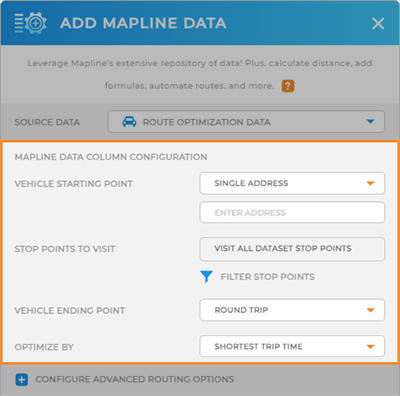
VEHICLE POINTS
This section tells Mapline which data to work with.
First, determine where you want your routes to begin. Do your drivers all show up to the yard first thing to pick up their vehicles? Or, if you’ve uploaded your drivers’ starting points as a dataset, reference that instead!
Next, determine whether drivers will visit all stop points in your dataset, or if you need to assign stops based on certain criteria, such as vehicle type or driver capability.
Finally, pinpoint where you need your drivers to end their day. Do they need to return to the office, or bring their vehicle to a maintenance facility?
These options give you control over all of your drivers’ touch points throughout the day.
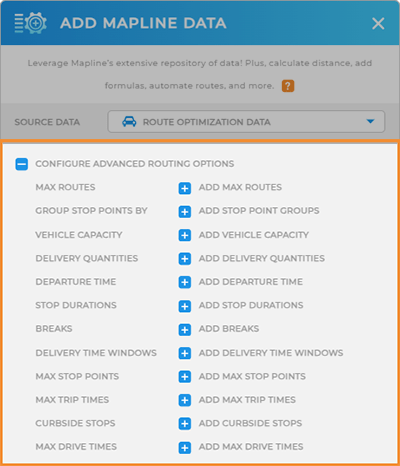
Trip Requirements
MAX ROUTES: Set the maximum number of routes for your dataset stops.
If you select Group Stop Points By, you can assign a max number of routes per group.
GROUP STOP POINTS BY: Organize stops based on criteria like delivery dates or personnel assignments. For instance, if your dataset includes delivery dates, choose GROUP STOP POINTS BY and select the delivery dates column to let Mapline calculate optimal delivery routes. Or, if you need routes assigned to specific personnel, use GROUP STOP POINTS BY and select the personnel assignments column for optimized routing based on assignments.
VEHICLE CAPACITY: If you’re making deliveries or your vehicles are picking up passengers, set a vehicle capacity, and your routes’ totals will always stay within this limit.
VEHICLE REQUIREMENTS: This option only appears if you select a dataset for your start points. Configure specific vehicle requirements to ensure the correct assignments.
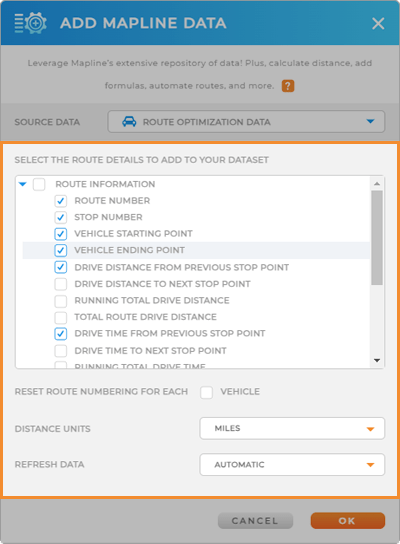
Route Details
If that level of customization doesn’t cover all your needs, we have further options for you. Define the specific data outputs you want. Once the routing is done, these outputs will be added as new columns to your current dataset. Choose from the following outputs:
- Route Number: Identifies the specific route each location belongs to.
- Stop Number: Indicates the specific position of each location along the route.
- Vehicle Starting Point: The initial place where the vehicle starts.
- Vehicle Ending Point: The final destination where the vehicle stops.
- Drive Distance From Previous Stop Point: The distance from the last stop.
- Drive Distance to Next Stop Point: The distance to the upcoming stop.
- Running Total Drive Distance: The total distance traveled from the route’s start to the current stop.
- Total Route Drive Distance: The complete drive distance covered for the entire route.
- Drive Time From Previous Stop Point: The time taken from the last stop.
- Drive Time to Next Stop Point: The estimated driving time to reach the next stop.
- Running Total Drive Time: The total drive time from the beginning of the route until the stop you’re on.
- Total Route Drive Time: The total driving duration of the whole route.
- Wait Time Since Previous Stop Point: The duration of time since the last stop.
- Trip Time From Previous Stop Point Departure: The time elapsed since departing from the previous stop.
- Route Start Time: The time when the route begins.
- Estimated Arrival Time: The expected time of arrival at a stop point.
- Estimated Departure Time: The anticipated time of leaving a stop point.
- Estimated Rotue End Time: The predicted completion time of the entire route.
- Stop Number (Reverse Order): The sequential number in reverse order from the last to the first stop point.