
Quick Reference Guide
ADD A NEW DATASET
- Quick Reference Guide
- ADD A NEW DATASET
Importing data into Mapline isn’t just quick—it’s seamless. Whether you’re mapping customer locations, optimizing delivery routes, or analyzing market trends, getting your data into the platform is the first step to unlocking its full potential. Mapline’s user-friendly interface ensures that even large datasets can be uploaded in moments, giving you access to powerful insights without the hassle. Let’s walk through the process and highlight a few tips to make it even smoother.
ADD FROM SPREADSHEET
Got a spreadsheet packed with data? Let’s get it into Mapline faster than you can say “geospatial analytics!” In no time, your data will be ready for mapping, analyzing, and uncovering insights that’ll make you feel like an office superhero!
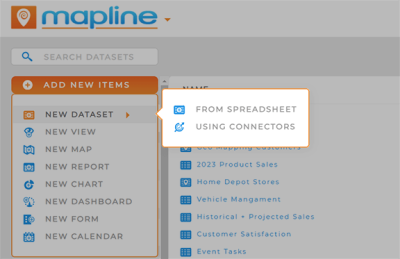
First, click the ADD NEW ITEMS menu from your home page in Mapline. Hover over NEW DATASET and select FROM SPREADSHEET.
But before you upload your spreadsheet, let’s make sure it has all the elements you’ll need to succeed in Mapline!
PROOF YOUR SPREADSHEET
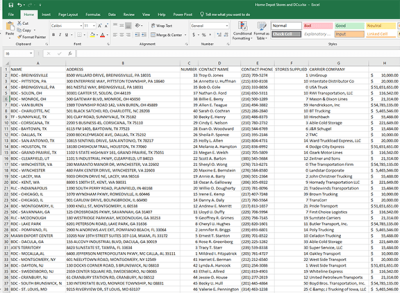
Before uploading your data, it’s essential to ensure your spreadsheet is properly formatted. Pay close attention to columns containing location data and confirm that they have the correct header names. Proper headers help Mapline process your data accurately.
For best results, include the following column headers in your spreadsheet:
- Address
- City
- State
- Zip Code (or Postal Code)
- County
- Country
- Latitude & Longitude (both values in the same cell)
Once your headers are in place, your data is ready for the next step!
UPLOAD SPREADSHEET
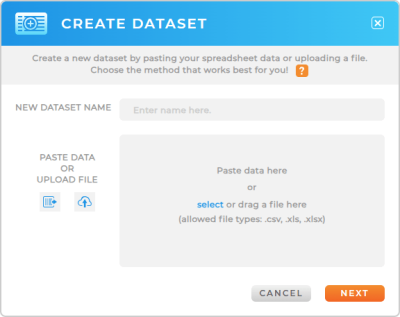
Now that your dataset is ready, click the UPLOAD icon or SELECT to choose a file from your device.
Once your file is uploaded, Mapline lets you pick the exact sheet you need (if your spreadsheet has more than one). Just select your sheet, click OK, and watch as Mapline works its magic, instantly turning your data into a brand-new dataset in your library.
IDENTIFY ADDRESS COLUMNS
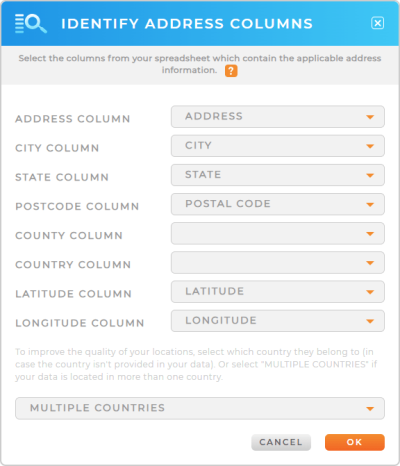
Once your data is pasted, Mapline automatically identifies address columns. Double-check these selections to ensure accuracy.
If a column is incorrectly labeled, use the drop-down menu to assign the correct header name.
If your spreadsheet doesn’t include latitude and longitude data, simply leave those fields set to None. Mapline can still process your data without them.
ADD FROM CONNECTOR
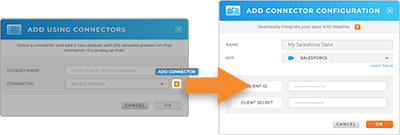
Or, maybe your data is saved in another platform or application? No sweat! Simply select ADD NEW ITEMS > USING CONNECTORS to sync your data.
First, click the ADD NEW ITEMS menu from your home page in Mapline. Hover over NEW DATASET and select USING CONNECTORS.
Name your connection, select your desired application, enter your credentials (such as Salesforce client ID or Google Drive login), then click OK.
SELECT DATA
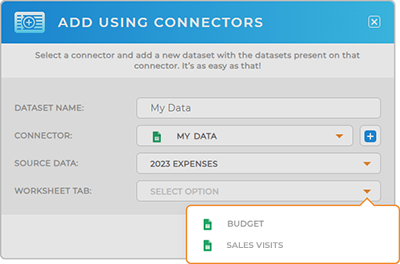
From here, you’ll have the option to cusotmize the data you’re importing. Just follow the instructions in the lightbox, then click OK.
For a more detail on how to add data from each type of connector, click here.
USE YOUR DATASET
Now that your data is in Mapline, it’s time to explore its full potential! From creating maps to generating insights, your dataset becomes a powerful tool for decision-making. Here are just a few ways businesses leverage their data:
- Add custom territories to your map
- Create optimized one-time routes
- Compare and contrast competitor locations
- Generate geo-aware charts, reports, and dashboards
