Create an End-to-End Customer Management System
- How To Guide
- Create an End-to-End Customer Management System
When it comes to your customers, the more you know, the better you can deliver that superhero-level service they expect. But let’s face it–collecting, storing, and managing all that customer info can turn into a chaotic mess faster than you can say “mission accomplished.”
At best, you’re juggling spreadsheets, trying to update your CRM while you’re out in the field—it’s not exactly smooth sailing. At worst, important follow-ups slip through the cracks, appointments get missed, and customer needs go unmet, all of which can hit your bottom line hard.
And with your team using everything from notebooks to emails, CRMs, and even sticky notes, it’s no wonder things fall apart sometimes. But that’s about to change.
It’s time to build a unified system that does the heavy lifting for you—automatically collecting, storing, and analyzing your data so you can send out automated communications, auto-schedule follow-ups, and streamline your reporting without breaking a sweat. No more missed details, no more errors—just smooth, consistent service every step of the way.
Plus, when you empower your team with real-time customer insights while they’re on the move, they can focus on what they do best: delivering incredible service, every single visit. Let’s get started on building your ultimate customer management system. Trust us, this is one upgrade you won’t want to miss!
TRACK CUSTOMER DATA ALL IN ONE PLACE
Staying on top of every opportunity, contact, and next step is crucial when you’re managing a field service team. Missing a follow-up or losing track of important customer details can lead to missed opportunities and unhappy customers. But with a streamlined system in place, you can ensure every detail is captured and every opportunity is seized. Let’s create a system that helps you keep everything organized, so you can focus on delivering top-notch service without the stress of managing the details.
CAPTURE CUSTOMER INFO ON THE GO
When your technicians are out in the field, capturing customer information quickly and accurately is key to maintaining high service standards. To facilitate this, we’ll create a custom form that your technicians can easily access on their mobile devices. As they complete jobs, they can fill out the form, add any necessary details, and instantly sync the data with your central system. This not only keeps your records accurate but also ensures that your team has all the information they need to provide exceptional service on every visit.
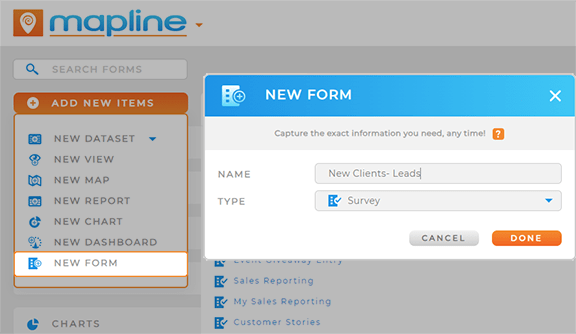
From the Mapline homepage, go to the ADD menu and choose NEW FORM. Name the form SERVICE VISITS and click OK. Customize your form by adding questions that will capture essential details about your service visits, including:
- Job Location
- Customer Name
- Service Type
- Job Status
- Date of Service
- Photos of Service
- Customer Notes
- Urgent follow-up needed
After you’ve added all the necessary fields, adjust the form submit settings to gather important metadata like the exact time and location stamp or the name of the service agent completing the form. You can also customize where you save your form data, giving you the power to ensure you always have the right data in the right place. When you’re finished, click SAVE to apply your changes.

Pro Tip: Repeat this step to create a separate form for new leads your team encounters in the field. This is a fantastic way to empower your team to submit new leads no matter where they are, and wrap those leads into your existing automations.
STREAMLINE LEAD INTAKE AND SCHEDULING
Schedule new appointments on the spot, without missing a beat. Share your lead intake form with your team or embed it on a webpage, empowering your team to capture leads and set up appointments seamlessly, even in the most time-sensitive situations.
To wrap your lead intake into your automations, edit your form submission settings. Toggle POST SUBMISSION NAVIGATION on and select the colum in your dataset that has a location-specific dashboard. This feature allows you to automatically redirect team members to a custom dashboard as soon as they submit the form.
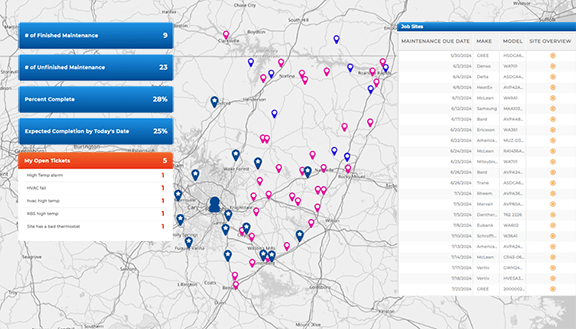
The real magic happens in this dashboard. You can easily visualize this data on your map, showing all available technicians, along with their last known locations. This real-time visual lets your team instantly see who’s closest to the new lead and available to take on the job. It’s particularly effective for managing last-minute or emergency appointments, ensuring that your team can respond quickly and efficiently, no matter the circumstances.
AUTO-CALCULATE NEXT VISIT DATE
Keeping track of when a customer needs their next service visit can be a challenge, especially when you’re managing a large number of accounts. Let’s automate this process and eliminate the risk of missing a follow-up appointment.
By adding a Mapline Data column that auto-calculates the next visit date based on the last visit, you can ensure that every customer is scheduled for their next service on time.
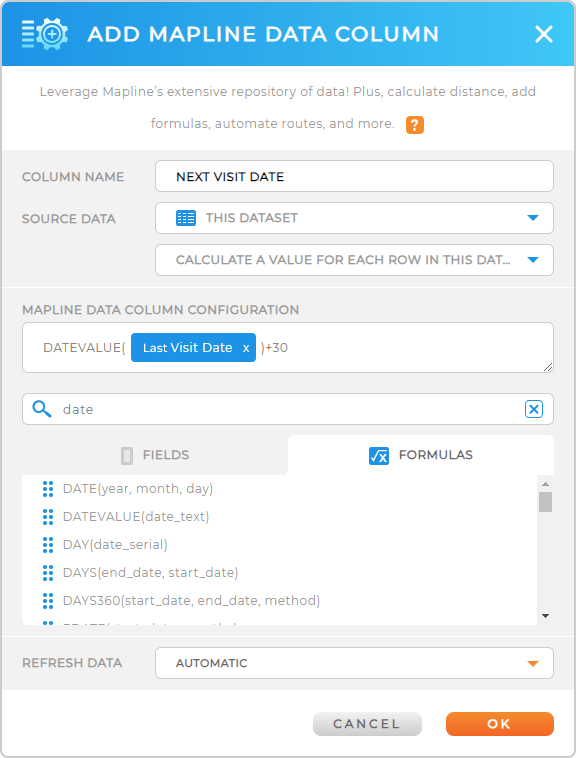
Open your job locations dataset and click the MAPLINE DATA icon. Name your new dataset column NEXT VISIT DATE and select your source dataset–this should be the same dataset to which you’re saving your customer data after each form submission.
Next, select CALCULATE A VALUE FOR EACH ROW IN THIS DATASET USING A FORMULA and configure your formula to calculate the next visit date. When you’re done, click OK.
Now, as soon as a job is completed, the system automatically sets the date for the next appointment!
Your team will never have to worry about manually tracking this information, and you can rest easy knowing that no customer will be overlooked.

Pro Tip: Automate your job assignments and calculations to ensure that the right field service agents are always matched with the right jobs! Optimize drive distances for each of your team members and take on more jobs than ever while keeping your team and customers satisfied.
AUTOMATE COMMUNICATIONS
In the fast-paced world of field services, timely communication is everything. Whether it’s sending a follow-up email after a service visit or adding new leads to your sales funnel, automating these processes can save you time and ensure that nothing slips through the cracks.
Let’s configure your form submit settings to automatically trigger these actions, so your communications are always on point.
Next, set up custom workflows and automated communications to improve customer follow-up. For example, let’s create a custom action trigger to instantly schedule missed appointments.
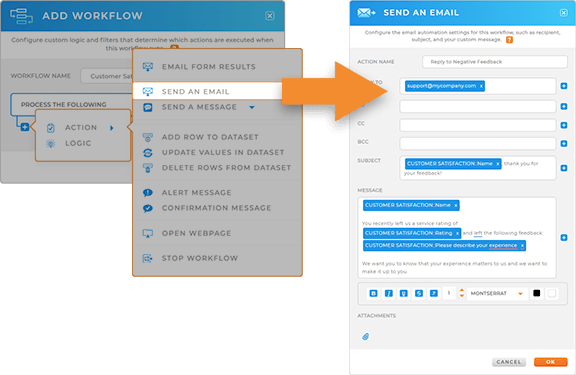
Open your customer management form, click the SUBMIT section, and select SETTINGS. Under ACTIONS, click ACTION COLUMN, and name your action RESCHEDULE MISSED APPOINTMENTS. Under ACTIONS, select UPDATE EXISTING VALUES IN DATASET and configure your workflow settings to update the next visit date for a customer whenever an appointment is missed.
Add as many actions as needed to ensure that missed appointments get taken care of–for example, send an email to a supervisor, or send an appointment reminder to the customer. When you’re done customizing your workflows, click DONE to apply your changes.
ENHANCE TEAM VISIBILITY
When your team has full visibility into their customer data, they can deliver better service and make smarter decisions. Let’s create a new dataset column that gives your service members insight into each individual customer. This is a great way to give your team the tools they need to drill down into specific data for each customer or location.
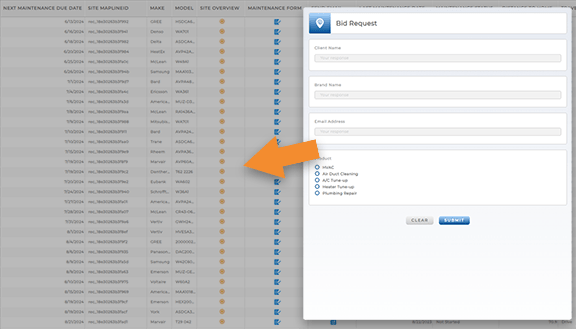
Select the map layer containing your job locations and click VIEW DATA. From the top menu bar, click the ADD CONTROL icon and choose VISUALIZATIONS. Name your new dataset column SITE DATA, pick either CHART or REPORT as the source type, and adjust the settings to display the data you need.
Next, share a view with your team to ensure they have access to the data relevant to the locations they manage. This equips your team with crucial insights into each location they service, allowing them to make well-informed decisions that keep your operations efficient and your customers satisfied.
